Configuring n8n for the Study Buddy Stack
How to point your own n8n instance at the three ARC services behind the Study Buddy framework — the Ollama proxy for inference, CubeFS for files, and PostgreSQL for state — plus the chat trigger that connects your workflow to the Study Buddy interface.
All of these services are reachable on campus or over the VPN only.
Each of the three services needs a credential created once, which you then select from any node that talks to that service. The pattern is the same every time: open a node, click the Credential dropdown, choose Create new credential, fill in the connection fields, and watch for the green Connection tested successfully banner before saving.
Throughout this post, <uid> means your GSU user ID — the same one you use to log in.
Keep your own keys to yourself. Credentials live in n8n’s encrypted credential store, not in the workflow. When you export or share a workflow, the credential is referenced by name and the secret stays behind — so never paste a key or password into a node parameter, a sticky note, or a prompt.
First run: turn off the AI Assistant
A fresh instance opens on the AI Assistant promotion. The Assistant calls an external service that is not part of this course’s stack, so switch it off before you start building.
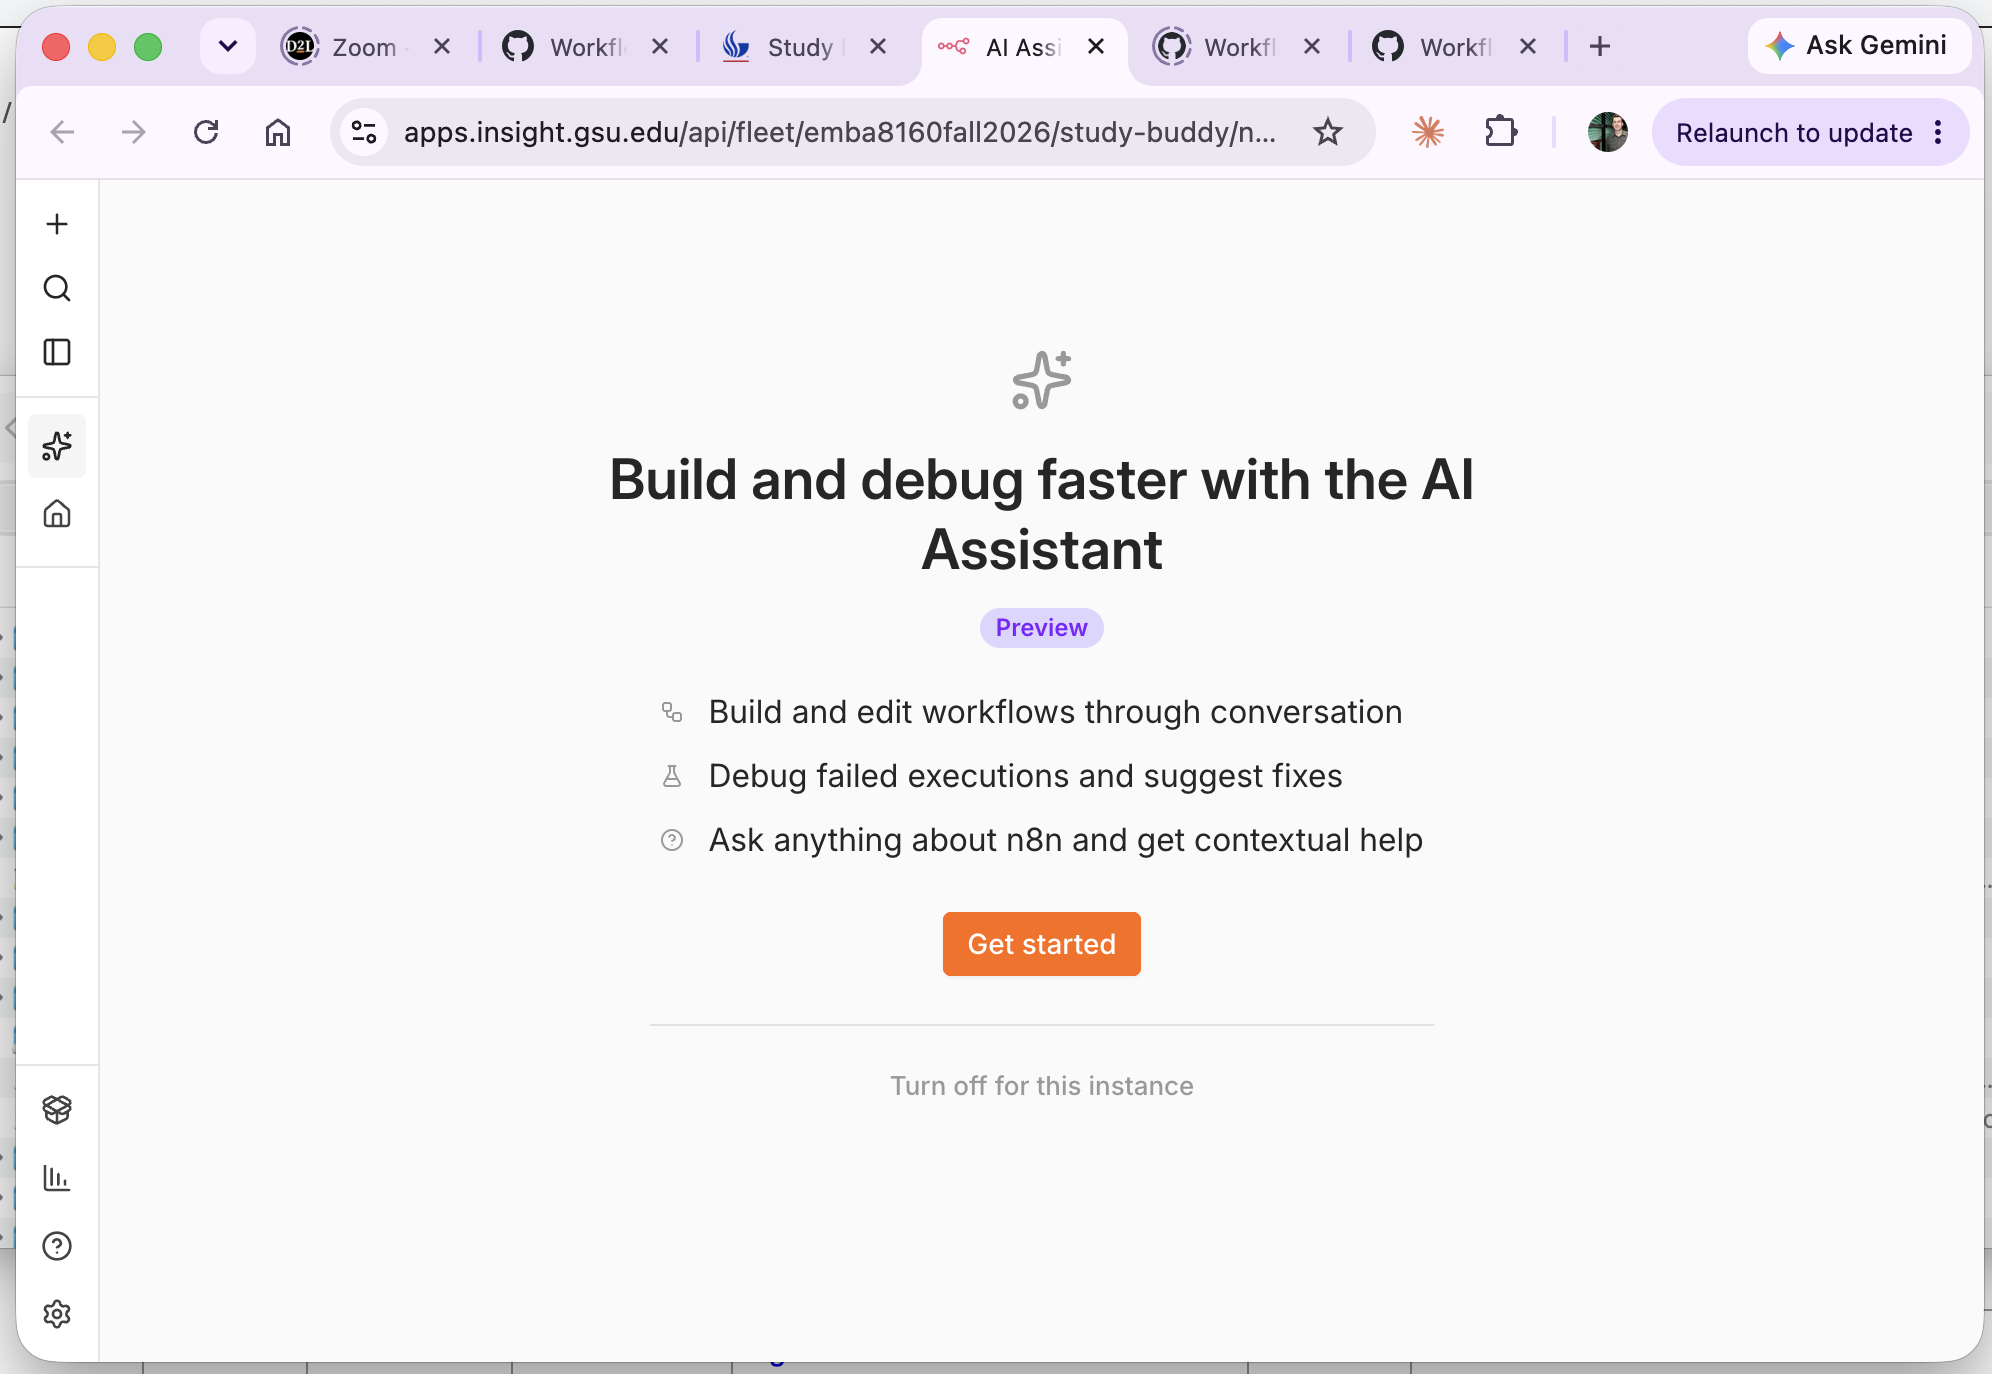
- Ignore the orange Get started button.
- Click Turn off for this instance underneath it.
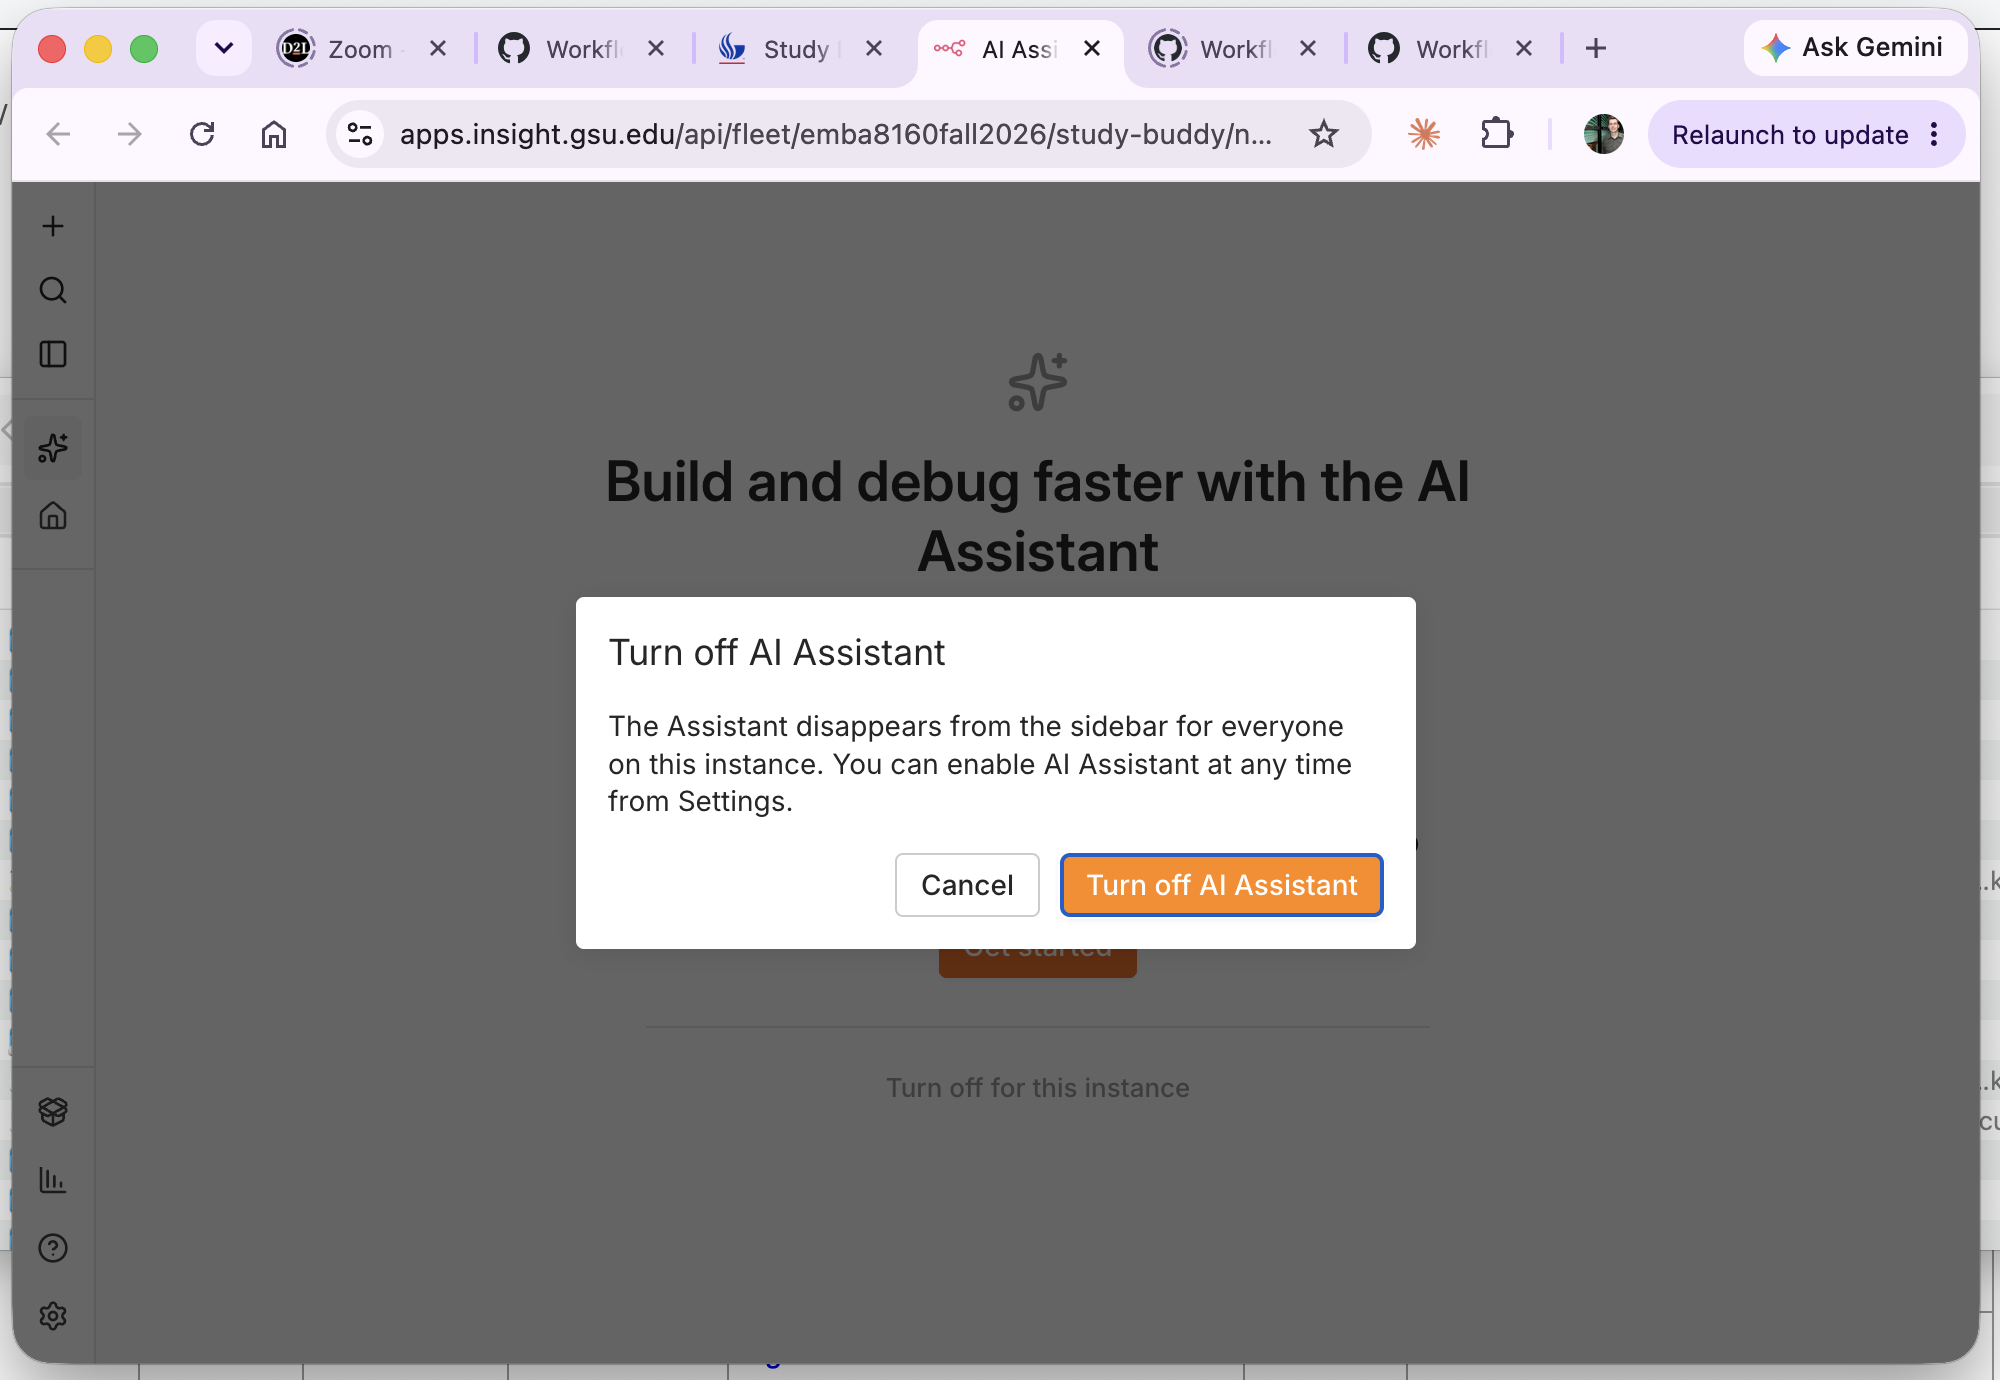
- Confirm with Turn off AI Assistant.
The Assistant disappears from the left sidebar for everyone on the instance. It is reversible — Settings has a switch to bring it back if you ever want it.
Ollama
Connect to the Ollama proxy on ARC. This is the inference endpoint your agent and chat nodes use; the proxy requires a Bearer API key on every request, which n8n sends for you once the credential is in place.
Before you start, create a key in the API Key Manager. Issue a separate key for this project rather than reusing one — access and limits stay scoped, and you can revoke it without breaking anything else.
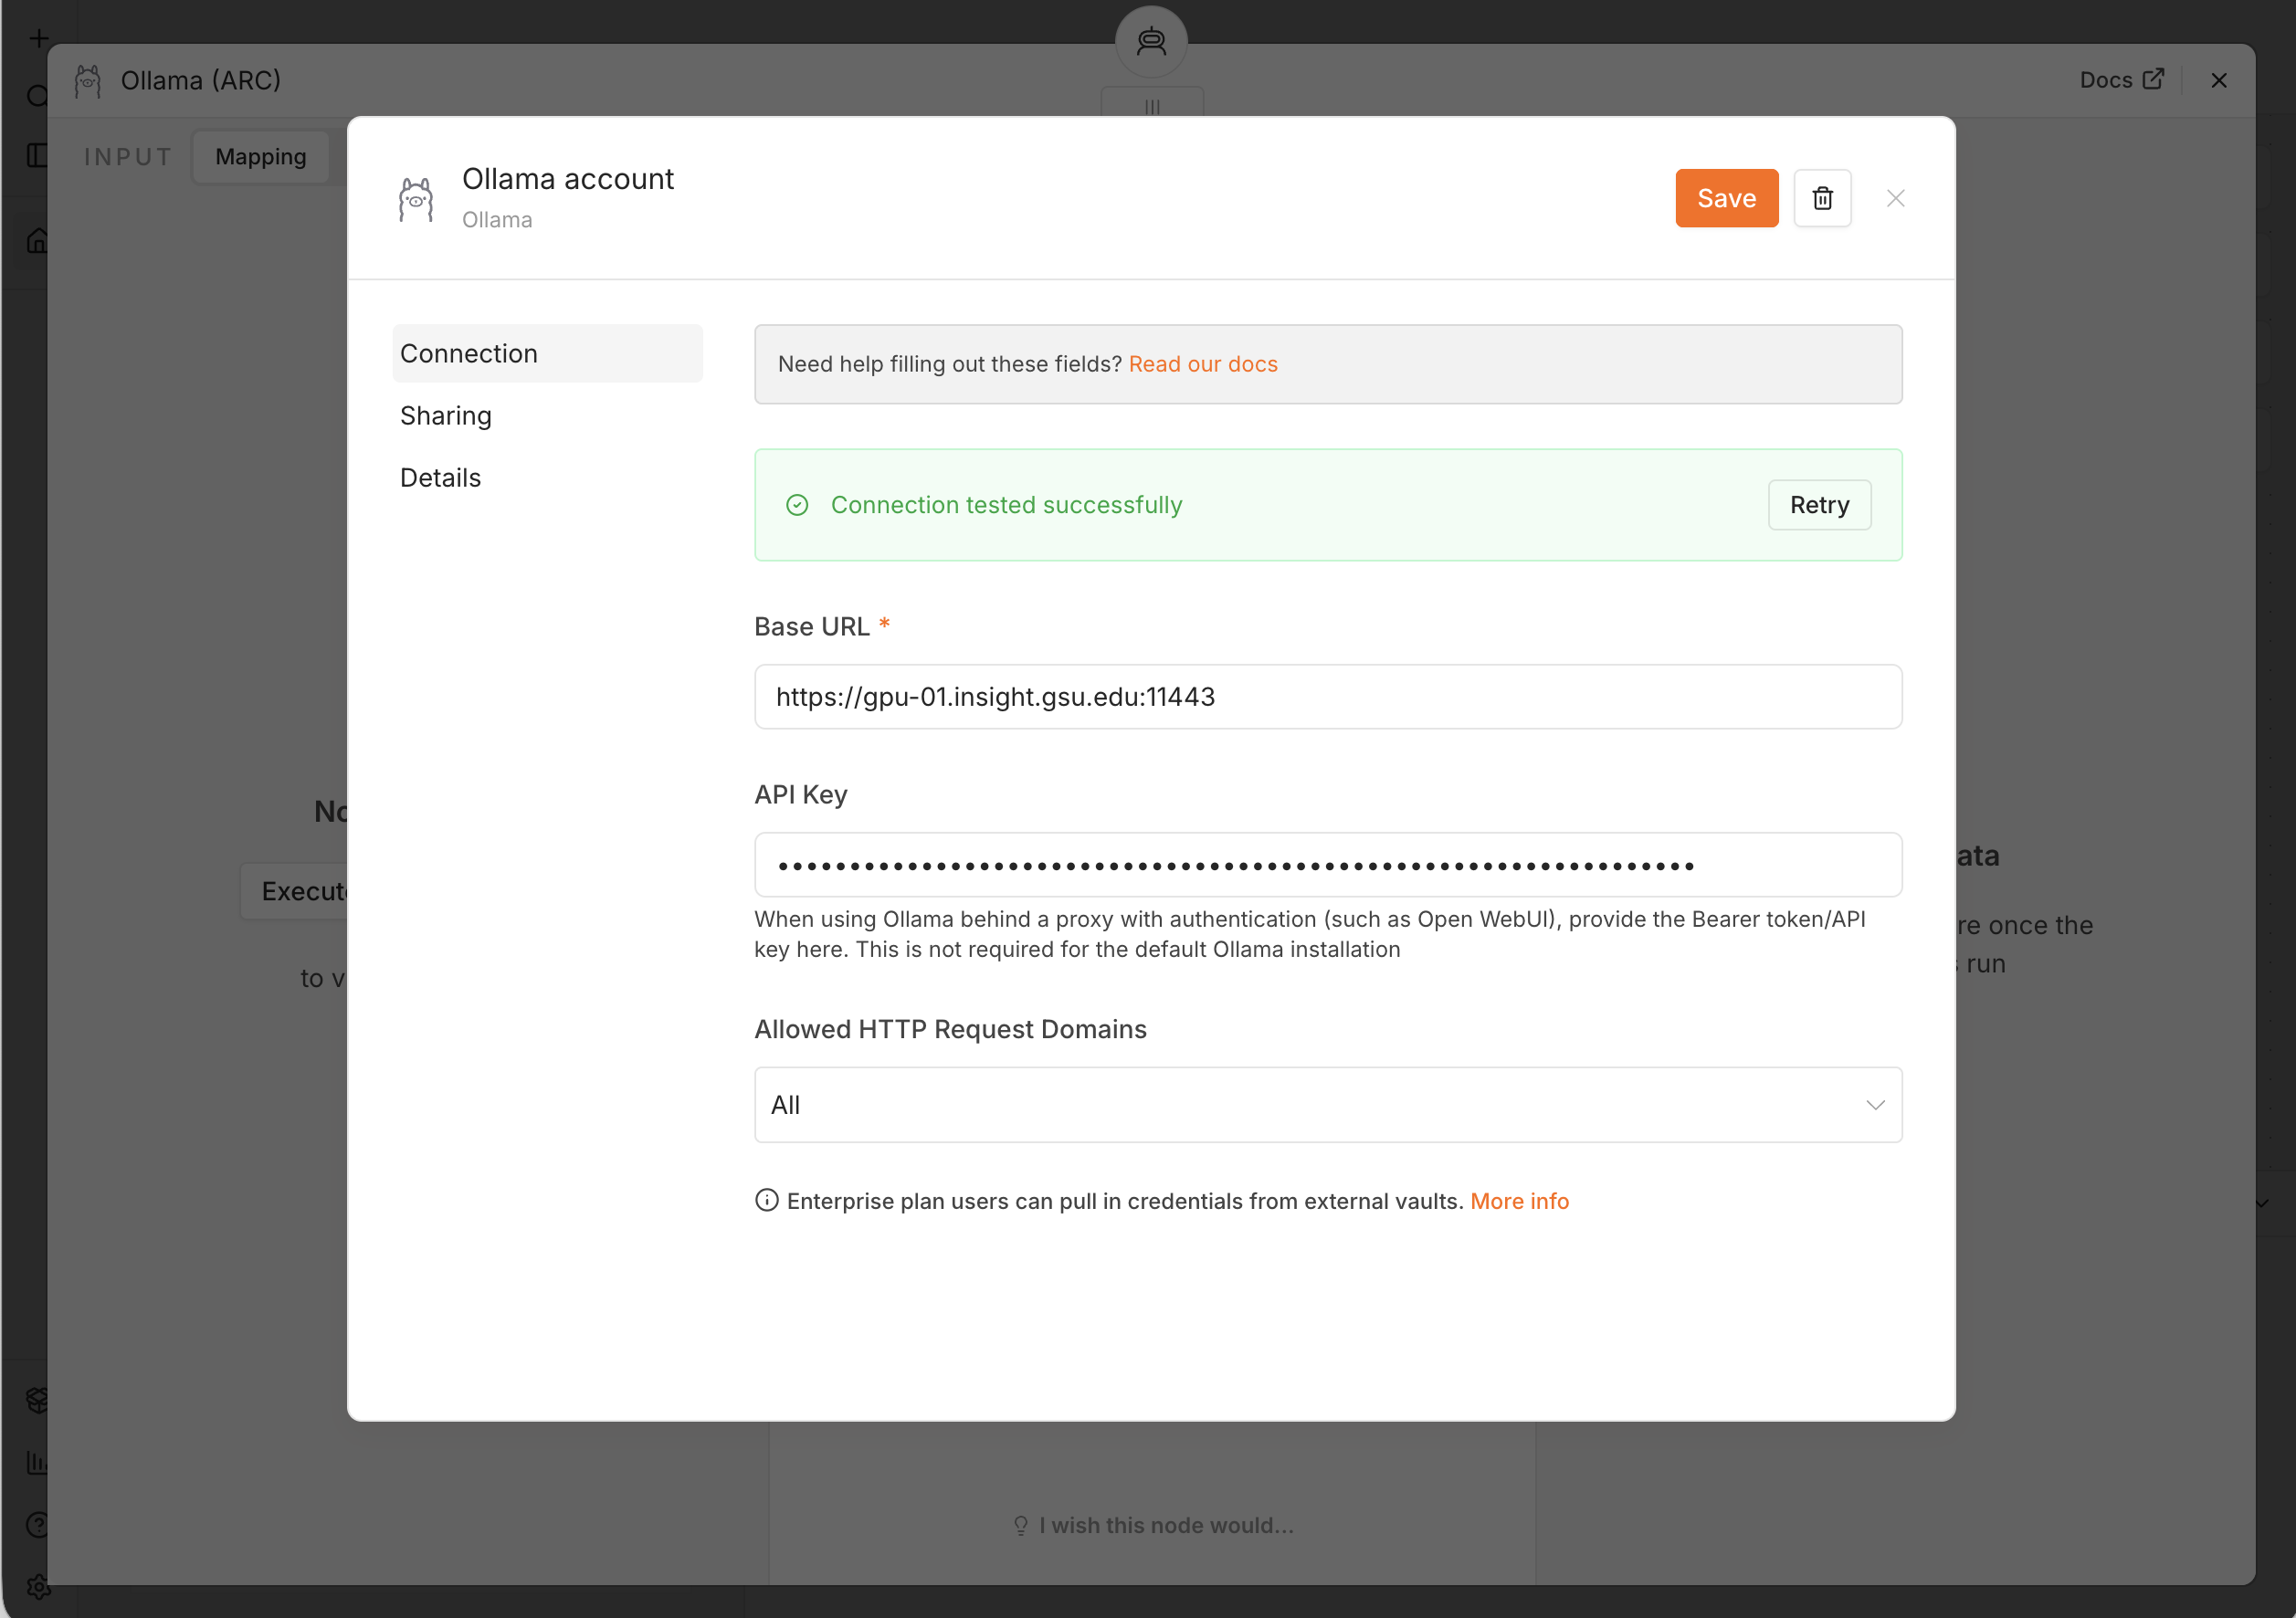
- Add any Ollama node — Ollama Chat Model is the usual starting point — and open it.
- In Credential to connect with, choose Create new credential.
- Fill in the two fields:
| Field | Value |
|---|---|
| Base URL | https://gpu-01.insight.gsu.edu:11443 |
| API Key | your key from the API Key Manager |
| Allowed HTTP Request Domains | All |
- Wait for Connection tested successfully, then Save.
Name it something you will recognise later — Ollama (ARC) is a good default, since you will pick
it from a dropdown in every model node you add.
A few things worth knowing:
- The API Key field is optional for a stock Ollama install, which is why the help text under it
says so. It is not optional here: the ARC endpoint is behind an authenticating proxy, and
leaving it blank returns
401 Unauthorized. - Your key’s POSIX group decides which models you can see and use. If a model is missing from
the node’s model dropdown, or you get a
403, it is a permissions question rather than a typo. - There is also an HTTP endpoint on port
11434. Use the HTTPS one above; fall back to HTTP only to work out whether a connection problem is TLS or reachability.
CubeFS
Connect to CubeFS, the object store that holds your files. It speaks the S3 protocol, so you configure it with n8n’s generic S3 node — not the AWS S3 node.
Each user has their own volume, emba8160fall2026-<uid>. The access key and secret key are
provided by the instructor.
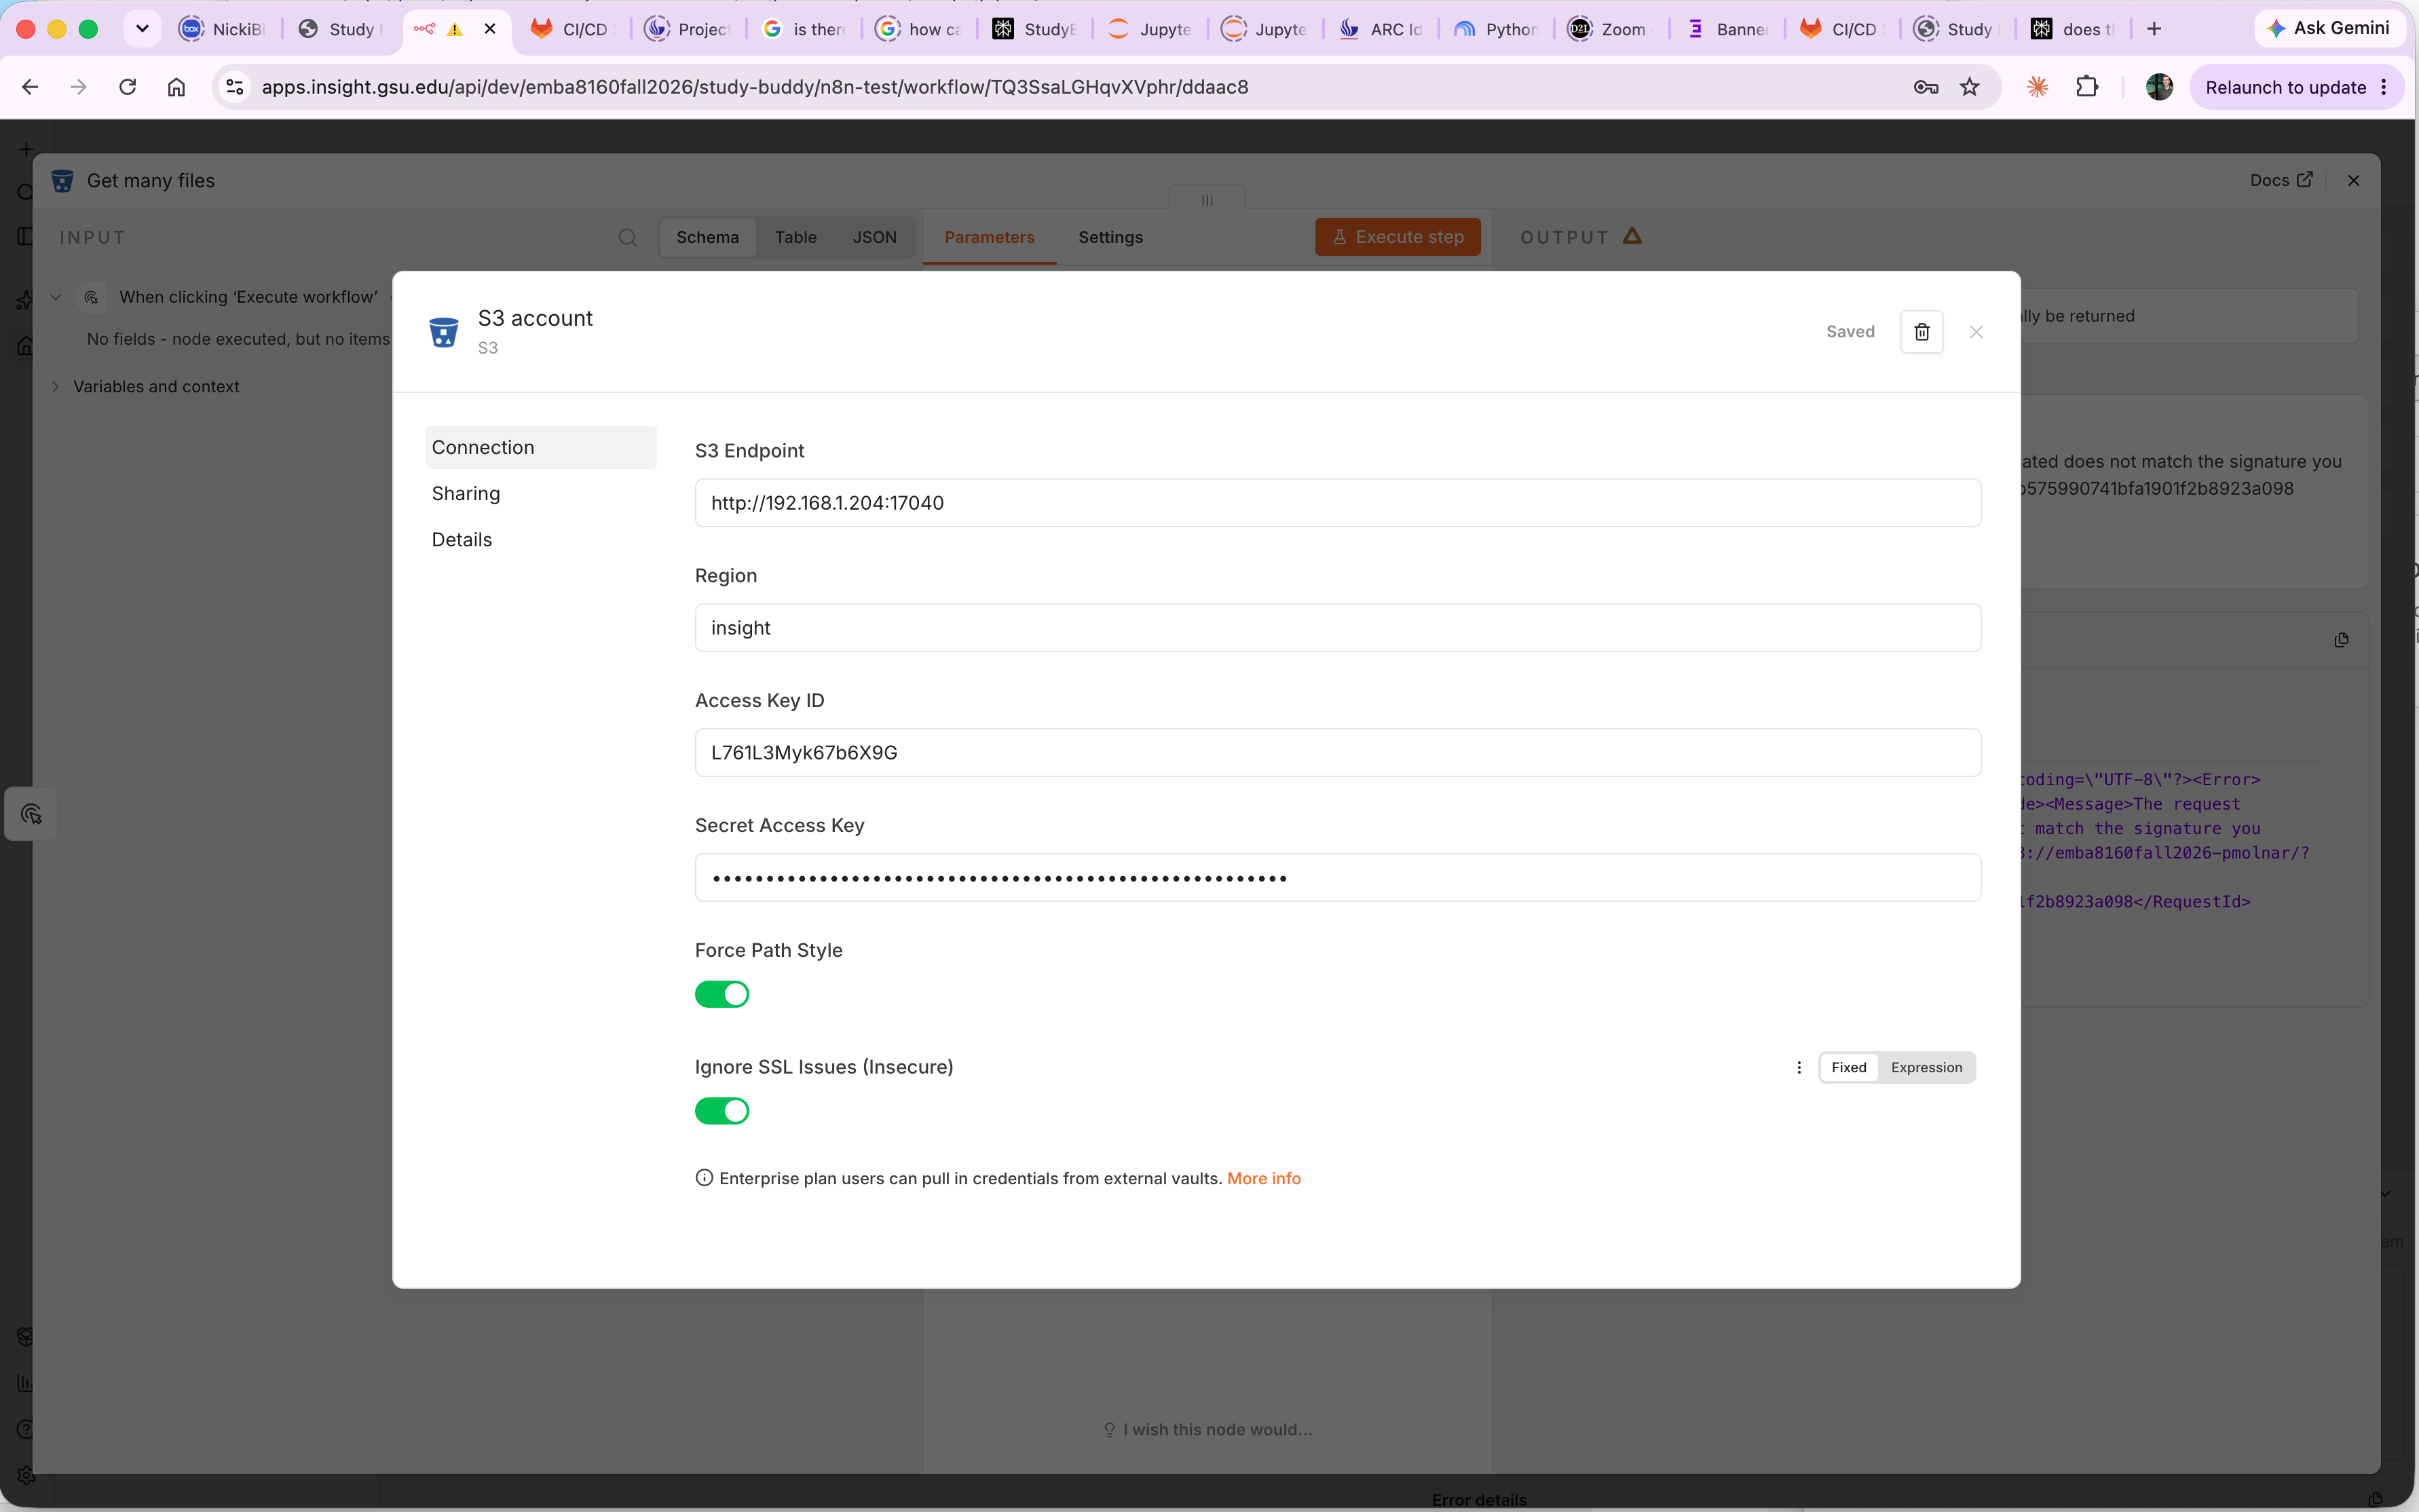
- Add an S3 node and open the Credential dropdown, then Create new credential.
- Fill in the connection:
| Field | Value |
|---|---|
| S3 Endpoint | http://192.168.1.204:17040 |
| Region | insight |
| Access Key ID | provided by the instructor |
| Secret Access Key | provided by the instructor |
| Force Path Style | on |
| Ignore SSL Issues (Insecure) | on |
- Save.
The last two switches are the ones that trip people up, and both are required:
- Force Path Style puts the volume in the URL path (
…/emba8160fall2026-<uid>/…) instead of in the hostname. AWS uses the hostname style; CubeFS does not, and with this off every request goes to a hostname that does not resolve. - Ignore SSL Issues is needed because the endpoint is reached inside the cluster network. Note that you are doing this deliberately on a private network — it is not a habit to carry over to services on the public internet.
If a request comes back with a signature mismatch error, the cause is almost always the access key and secret, not the endpoint. Re-paste both, watching for a stray space at either end.
Example: list the files in your volume
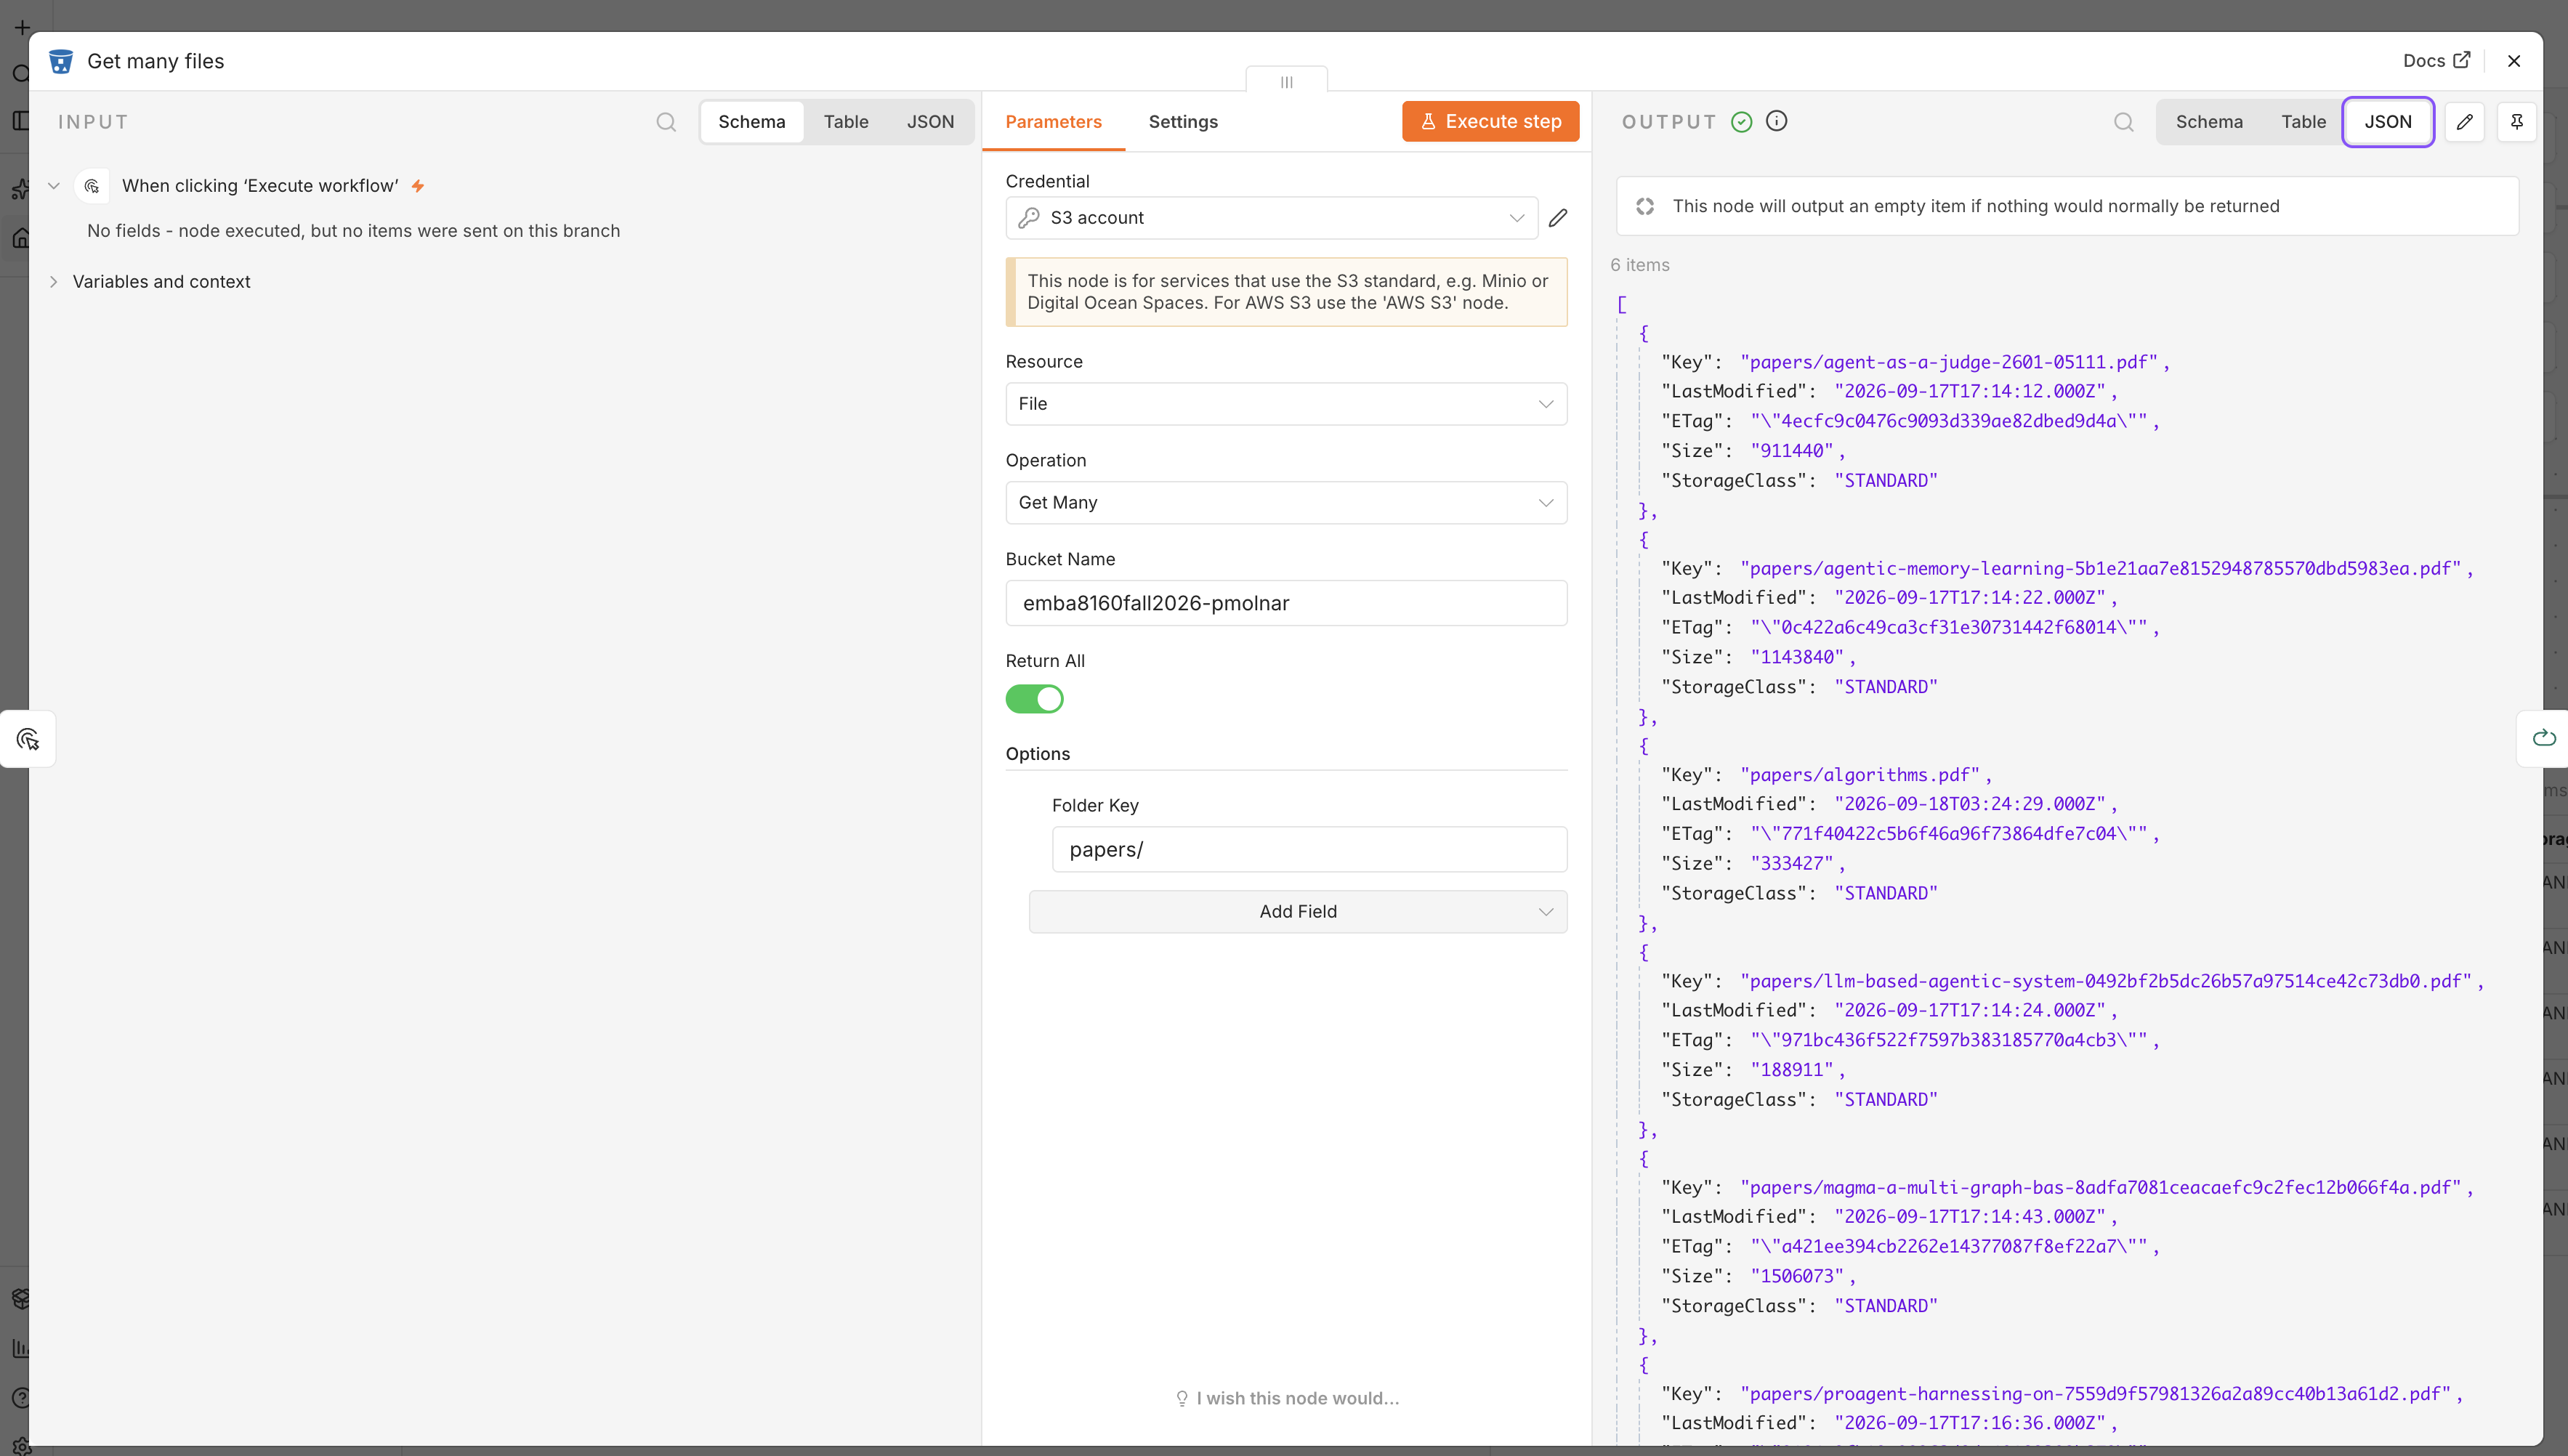
With the credential saved, this is the quickest way to prove it works end to end:
- Set Resource to
Fileand Operation toGet Many. - Put your volume in Bucket Name:
emba8160fall2026-<uid>. - Turn Return All on — otherwise you get the first page only.
- Optionally add the Folder Key field to scope the listing to one prefix, for example
papers/. The trailing slash matters. - Click Execute step.
The output panel lists one item per object, each with a Key, LastModified, ETag, Size and
StorageClass. The Key is the full path within the volume — that is the value you pass to a
Download operation further along the workflow.
Postgres
Connect to the Postgres server on ARC. This is where anything that has to survive a single run lives: chat memory, extracted metadata, tables your workflow writes to.
The database is emba8160fall2026, and each student has a personal schema named after their
<uid>.
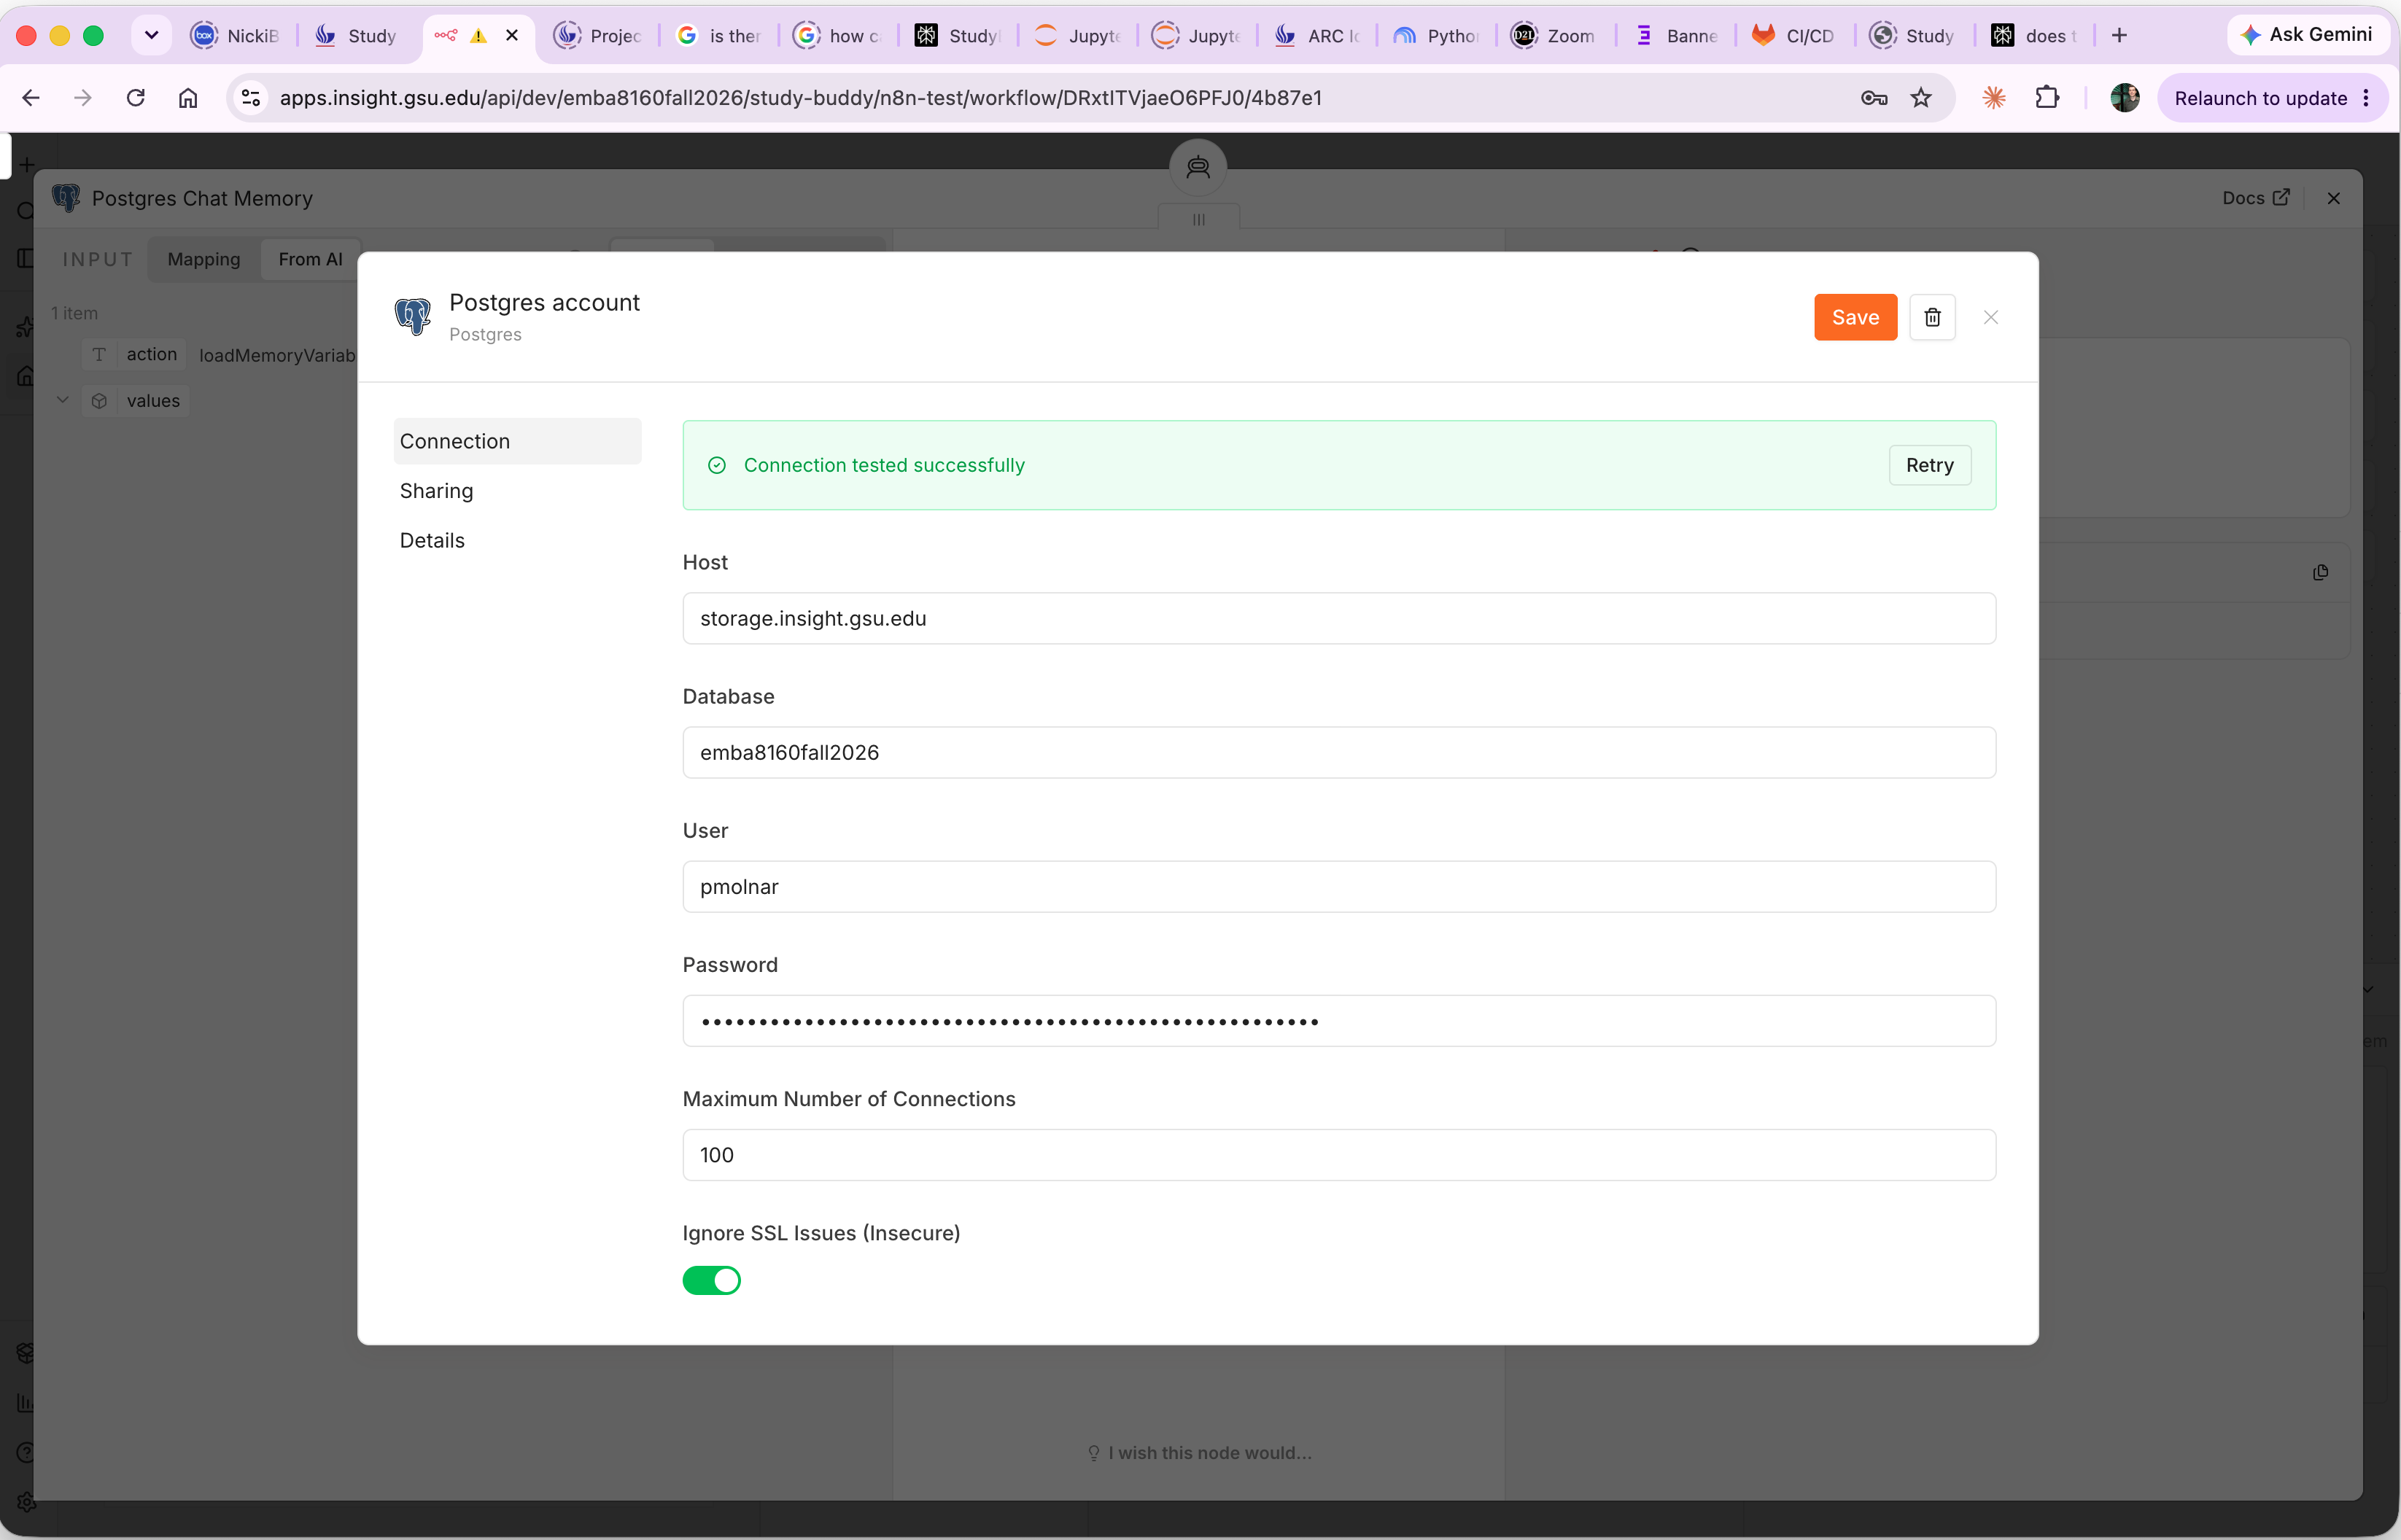
- Add a Postgres node (or a Postgres Chat Memory sub-node) and create a new credential.
- Fill in the connection:
| Field | Value |
|---|---|
| Host | storage.insight.gsu.edu |
| Database | emba8160fall2026 |
| User | <uid> |
| Password | provided by the instructor |
| Maximum Number of Connections | 100 |
| Ignore SSL Issues (Insecure) | on |
- Wait for Connection tested successfully, then Save.
Everyone in the class shares one database and is separated by schema, which has one practical consequence worth internalising before you write a query.
Example: always qualify the table with your schema
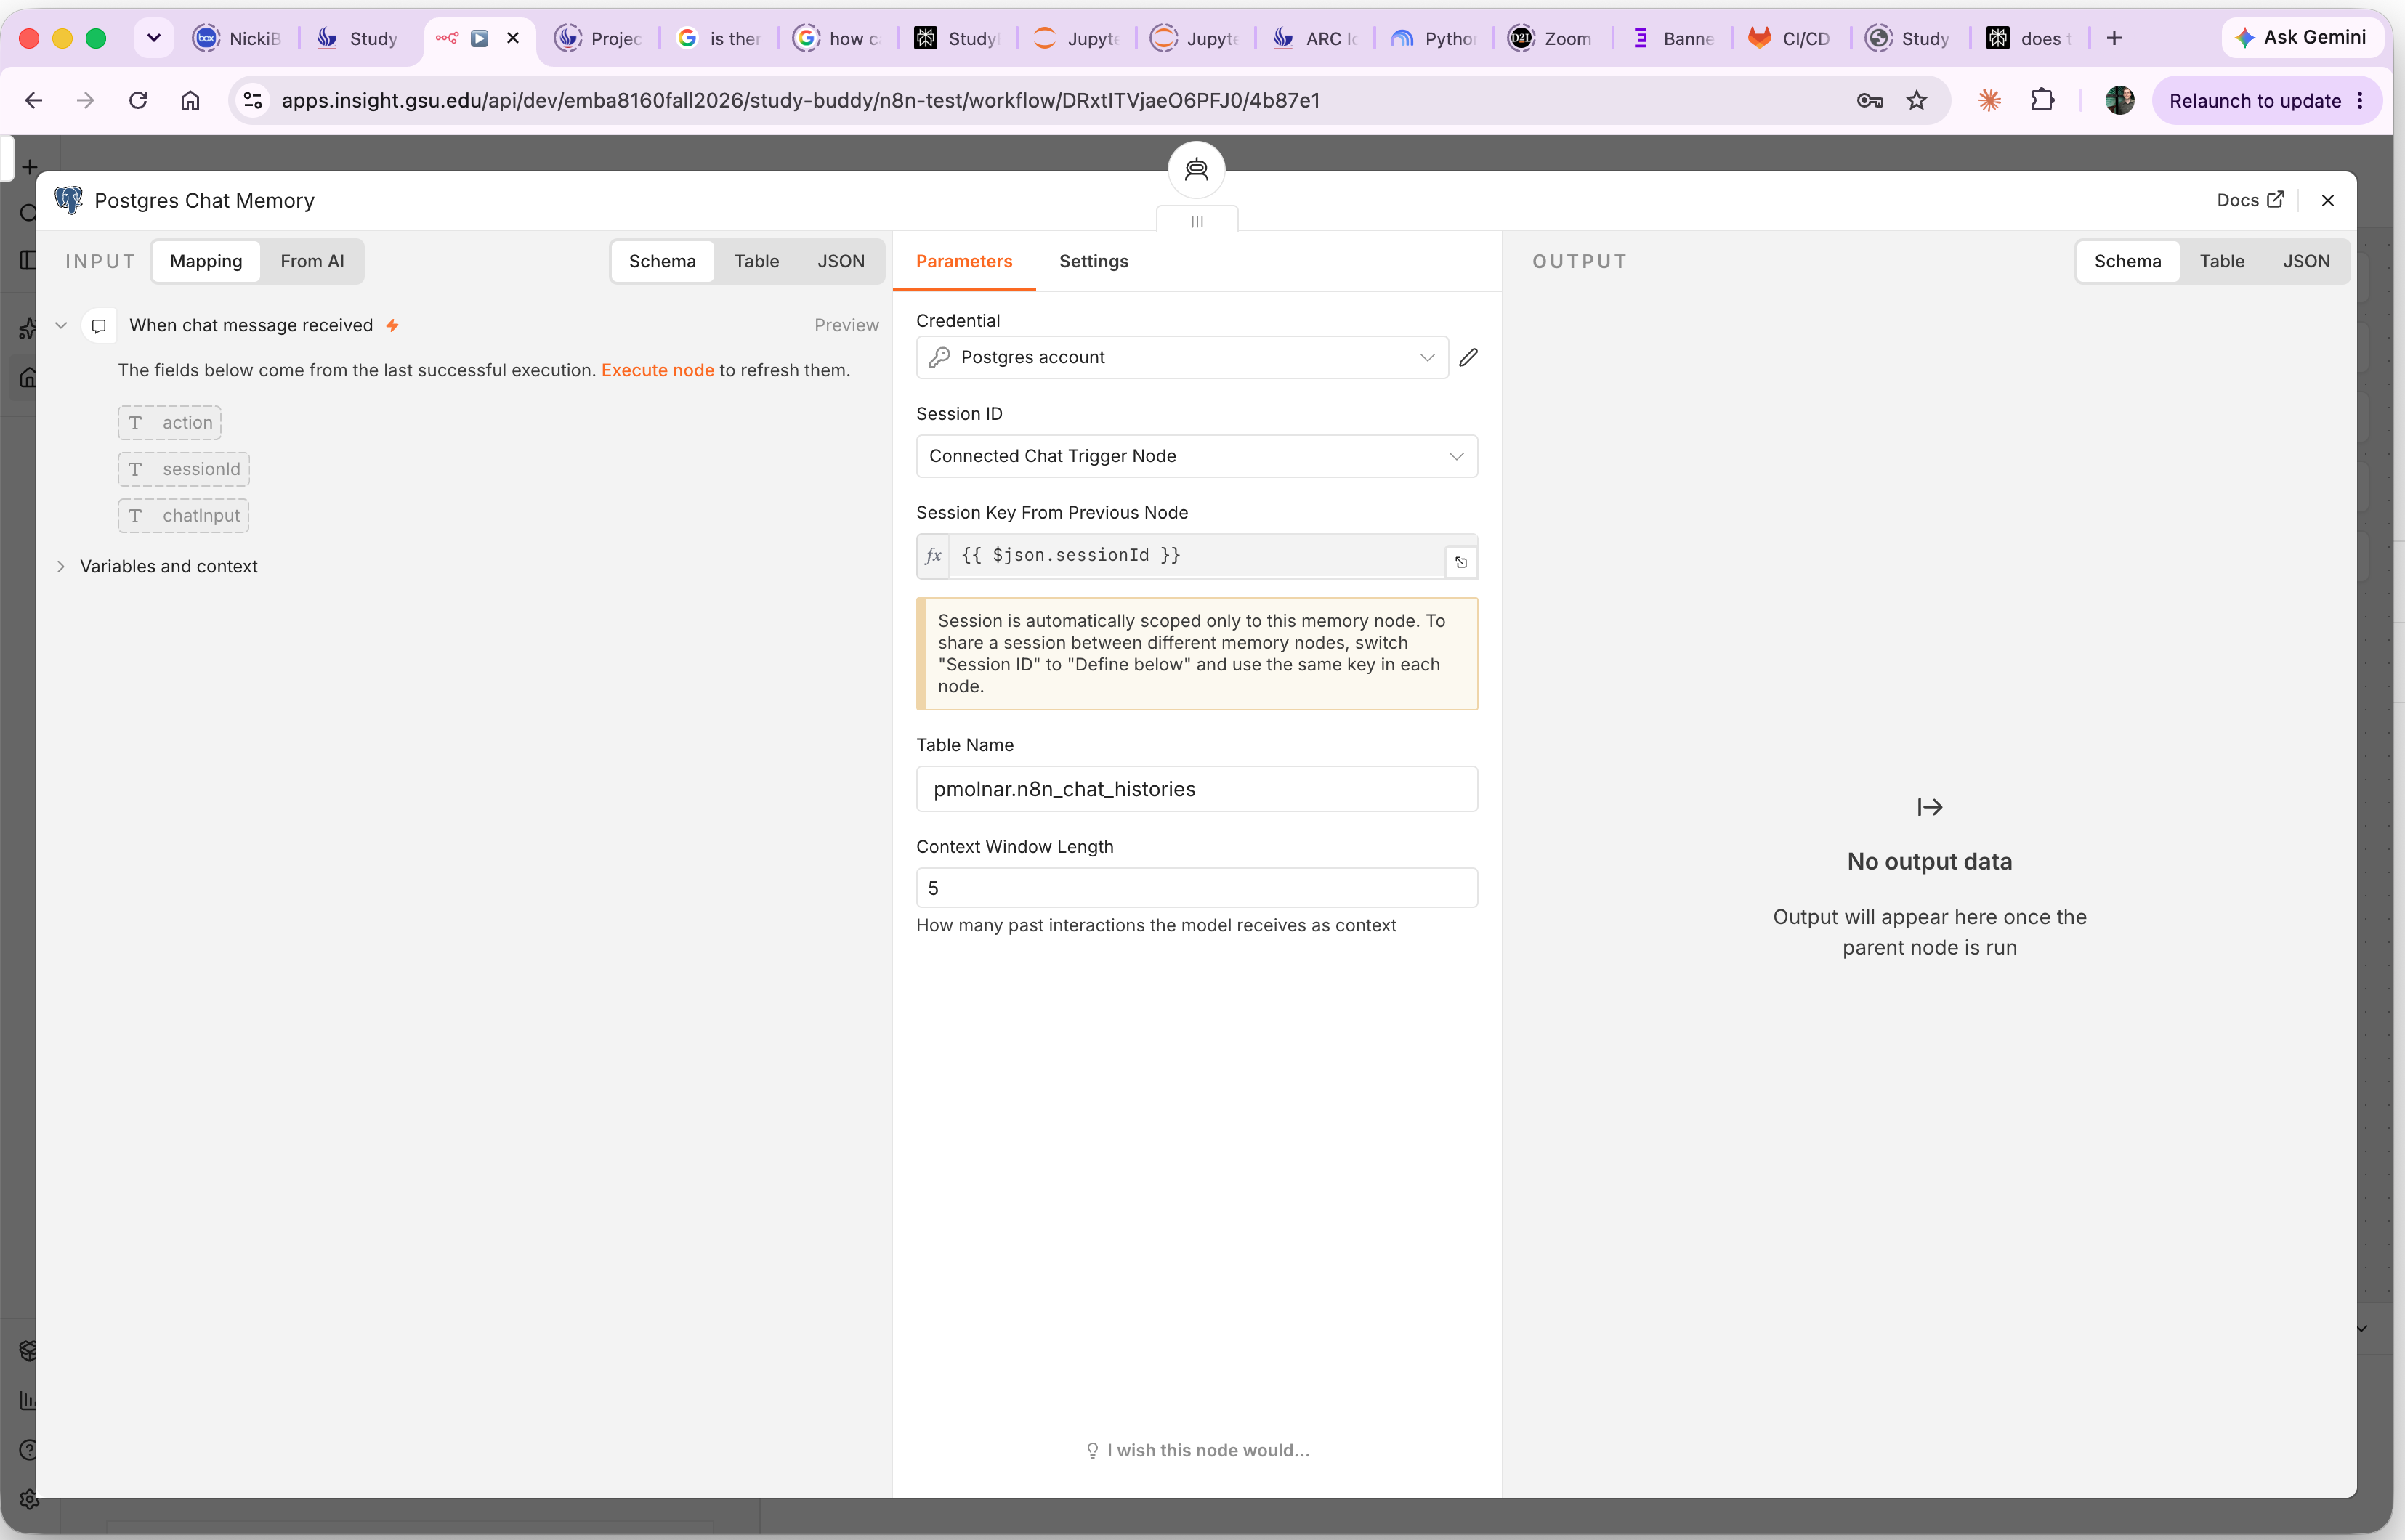
In the Postgres Chat Memory node above, the Table Name is pmolnar.n8n_chat_histories —
schema first, then the table. Yours is <uid>.n8n_chat_histories.
Write the bare name n8n_chat_histories and the query resolves against the default search path
instead of your schema: it will either fail with relation does not exist, or, worse, quietly
find someone else’s table. Qualify every table reference, in every node and every raw SQL
statement.
The rest of that node is the standard chat-memory setup:
| Field | Value |
|---|---|
| Session ID | Connected Chat Trigger Node |
| Session Key From Previous Node | {{ $json.sessionId }} |
| Table Name | <uid>.n8n_chat_histories |
| Context Window Length | 5 |
Context Window Length is how many past exchanges get replayed to the model on each turn. Five is a reasonable start: low enough to keep prompts cheap, high enough that the assistant remembers what you just asked it.
Connecting the workflow to Study Buddy
The last piece is the trigger that lets the Study Buddy interface talk to your workflow.
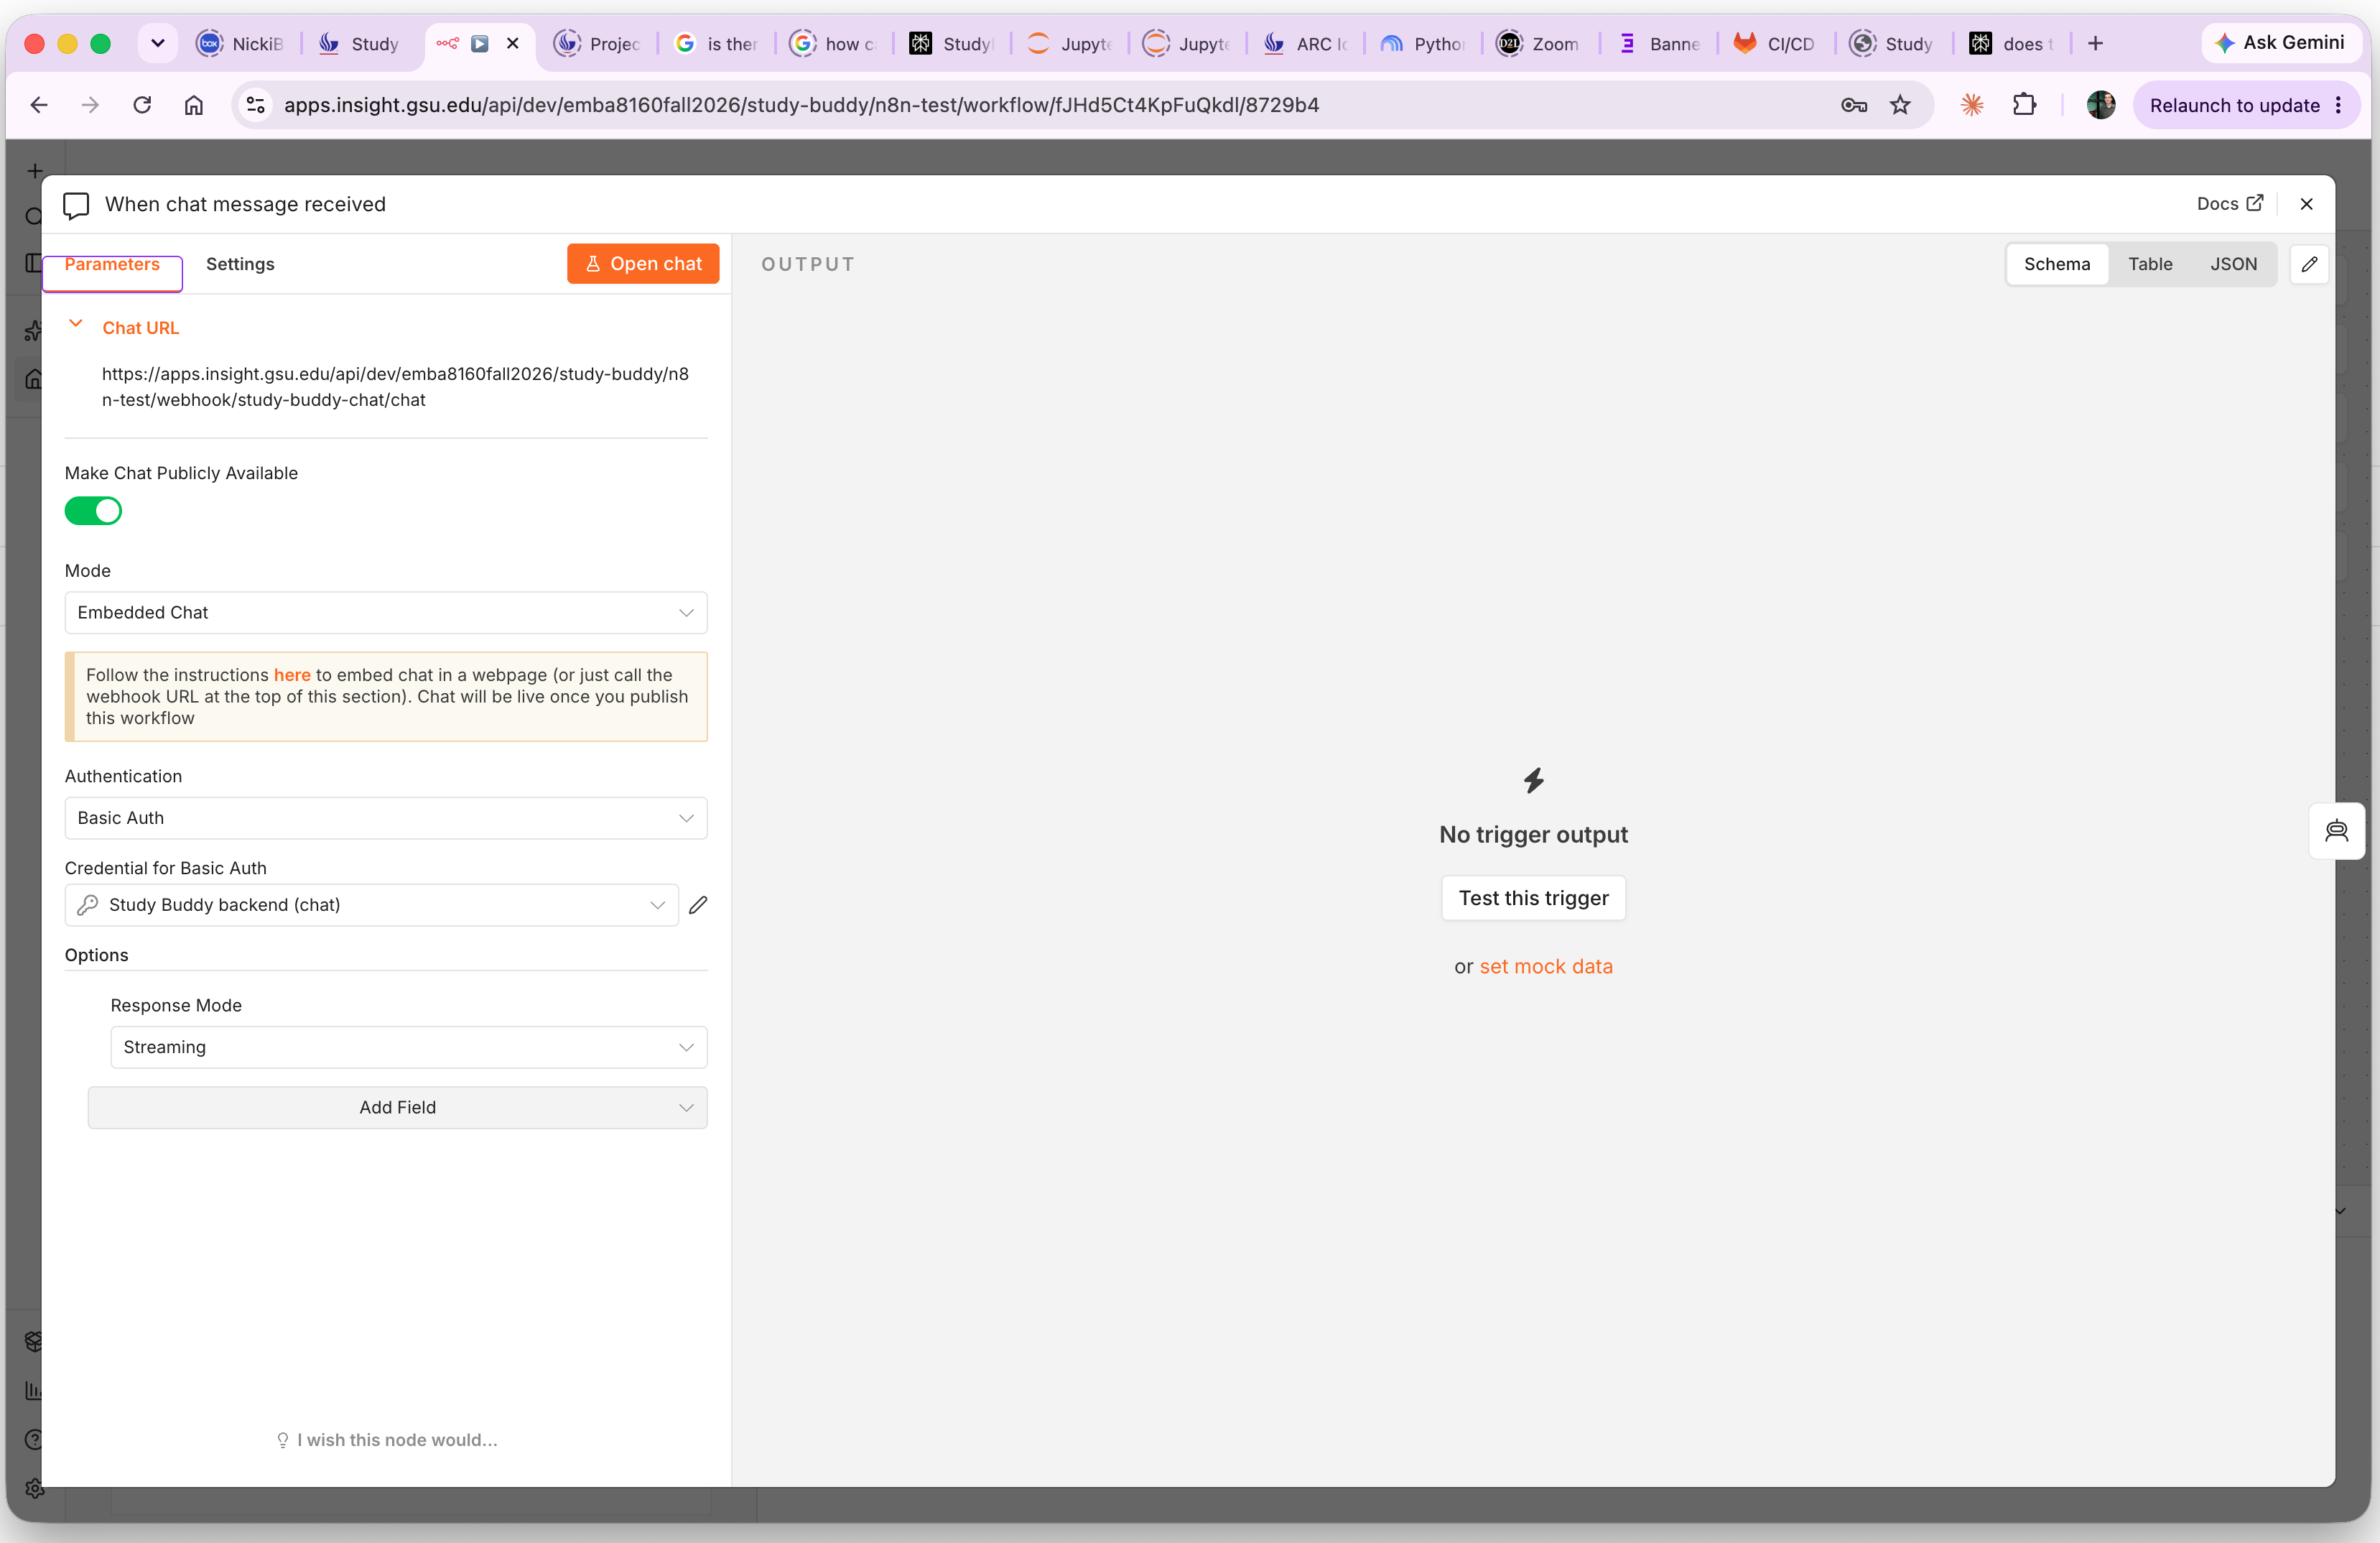
In the When chat message received trigger:
- Turn Make Chat Publicly Available on. Without it, the URL only works inside the editor.
- Set Mode to
Embedded Chat, so Study Buddy can host the conversation in its own interface rather than n8n’s hosted page. - Set Authentication to
Basic Authand select the Study Buddy backend (chat) credential. “Publicly available” means reachable from the gateway, not unauthenticated — the backend is the only caller, and this is what proves it. - Under Options, add Response Mode and set it to
Streaming, so replies appear token by token instead of arriving in one block after a long pause. - Copy the Chat URL from the top of the panel — that is what Study Buddy calls.
The panel’s own reminder is the step people miss: chat only goes live once you publish the workflow. Saving is not publishing.